Note
Click here to download the full example code or to run this example in your browser via Binder
Decoding with ANOVA + SVM: face vs house in the Haxby dataset#
This example does a simple but efficient decoding on the Haxby dataset: using a feature selection, followed by an SVM.
Retrieve the files of the Haxby dataset#
from nilearn import datasets

# By default 2nd subject will be fetched
haxby_dataset = datasets.fetch_haxby()
func_img = haxby_dataset.func[0]
# print basic information on the dataset
print('Mask nifti image (3D) is located at: %s' % haxby_dataset.mask)
print('Functional nifti image (4D) is located at: %s' %
      func_img)
Mask nifti image (3D) is located at: /home/alexis/nilearn_data/haxby2001/mask.nii.gz
Functional nifti image (4D) is located at: /home/alexis/nilearn_data/haxby2001/subj2/bold.nii.gz
Load the behavioral data#
import pandas as pd

# Load target information as string and give a numerical identifier to each

behavioral = pd.read_csv(haxby_dataset.session_target[0], sep=" ")
conditions = behavioral['labels']

# Restrict the analysis to faces and places
from nilearn.image import index_img
condition_mask = behavioral['labels'].isin(['face', 'house'])
conditions = conditions[condition_mask]
func_img = index_img(func_img, condition_mask)

# Confirm that we now have 2 conditions
print(conditions.unique())

# The number of the session is stored in the CSV file giving the behavioral
# data. We have to apply our session mask, to select only faces and houses.
session_label = behavioral['chunks'][condition_mask]
['face' 'house']
ANOVA pipeline with nilearn.decoding.Decoder object#
Nilearn Decoder object aims to provide smooth user experience by acting as a pipeline of several tasks: preprocessing with NiftiMasker, reducing dimension by selecting only relevant features with ANOVA – a classical univariate feature selection based on F-test, and then decoding with different types of estimators (in this example is Support Vector Machine with a linear kernel) on nested cross-validation.
Fit the decoder and predict#
Obtain prediction scores via cross validation#
Define the cross-validation scheme used for validation. Here we use a LeaveOneGroupOut cross-validation on the session group which corresponds to a leave a session out scheme, then pass the cross-validator object to the cv parameter of decoder.leave-one-session-out For more details please take a look at: <https://nilearn.github.io/stable/auto_examples/plot_decoding_tutorial.html#measuring-prediction-scores-using-cross-validation>
from sklearn.model_selection import LeaveOneGroupOut
cv = LeaveOneGroupOut()

decoder = Decoder(estimator='svc', mask=mask_img, standardize=True,
                  screening_percentile=5, scoring='accuracy', cv=cv)
# Compute the prediction accuracy for the different folds (i.e. session)
decoder.fit(func_img, conditions, groups=session_label)

# Print the CV scores
print(decoder.cv_scores_['face'])
[1.0, 0.9444444444444444, 1.0, 0.9444444444444444, 1.0, 1.0, 0.9444444444444444, 1.0, 0.6111111111111112, 1.0, 1.0, 1.0]
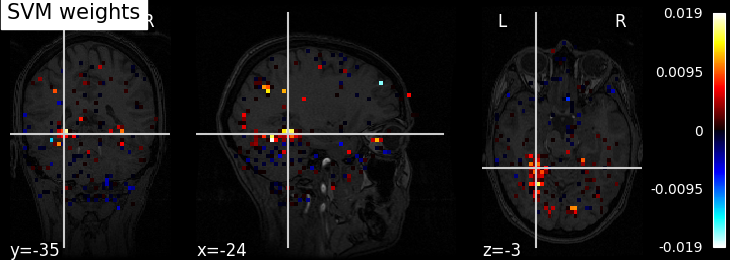
Visualize the results#
Look at the SVC’s discriminating weights using
nilearn.plotting.plot_stat_map
weight_img = decoder.coef_img_['face']
from nilearn.plotting import plot_stat_map, show
plot_stat_map(weight_img, bg_img=haxby_dataset.anat[0], title='SVM weights')

show()
Or we can plot the weights using nilearn.plotting.view_img as a
dynamic html viewer
from nilearn.plotting import view_img
view_img(weight_img, bg_img=haxby_dataset.anat[0],
         title="SVM weights", dim=-1)
Saving the results as a Nifti file may also be important
weight_img.to_filename('haxby_face_vs_house.nii')
Total running time of the script: ( 0 minutes 28.165 seconds)
Estimated memory usage: 916 MB